Tuesday, July 1, 2014

Update MP3 TAG a free audio metadata editor

Mp3tag is a freeware metadata editor for many audio file formats for PC. It supports ID3v1, ID3v2.3, ID3v2.4, iTunes MP4, WMA, Vorbis Comments and APE Tags.

It can rename files based on the tag information, replace characters or words in tags and filenames, import/export tag information, create playlists and more.

Mp3tag supports online database lookups from, e.g., Amazon, discogs, or freedb, allowing you to automatically gather proper tags and cover art for your music library.

With Mp3tag you can Batch Tag Editing, Download and add album covers to your files, Create playlists, Rename files from tags, Export to HTML, RTF, CSV, etc. For more information you can visit official page here. How to use this software you can check out here


Screenshots: http://goo.gl/0c7Bvj
Download: http://goo.gl/D4JUxA

Monday, June 30, 2014

How To Add Custom Locale To Android

If you need to change language in android but you can't find the language you want to change to, you can use an app name 'MoreLocale 2'. It's free and you can download it through Google Play. It works both root and unrootdevice. For root device it will use supersu access. For unroot device you need to grant the permission manually by 'pm' command. I'm not sure that this will works with all android version.


Instructions:
- Install & Open the app, Next Press Option Key -> Select Add Locale
- Input Label, ISO639, ISO3166. You have to use the correct Language and Country ISO code and click add.

Example: Cambodia:
ISO639: km
ISO3166: KH 

Find country ISO codes link below:

ISO639: http://goo.gl/wU2IFo 

ISO3166: http://goo.gl/3WOYoP


- For unroot device download and extract this file

- On your phone Enable USB Debuging and connect to computer.

-    Open extracted folder, Hold Shift and Right Click anywhere in that folder, choose Open command window here
-    Enter following two command line:
        adb shell
        pm grant jp.co.c_lis.ccl.morelocale android.permission.CHANGE_CONFIGURATION

-    Now in your phone go to app and follow the same instruction above.

Tuesday, June 17, 2014

Phone Shop In Cambodia

Mobile phone shops in cambodia listing. If you want to buy mobile phone and compare the price. 

Nika Phone Shop:
Website: www.nika.com.kh
Address1: #450Eo, Street 310, Boeung KengKang III, Chamkar Mon , Phnom Penh , Cambodia.
Contact:  017 935 151 / 011 935 151 / 015 935 151 / 013 935 151 / 023 6913 246
Address2: Kirirom branch #175E St. Presihanuk Sankat Vealvong Khan 7Makara Phnom Penh
Contact:  077 73 51 51


Hakse Phone Shop:
Website: www.hakse.com.kh
Hakse Kirirom 1
Address: No. 145Eo, Sihanouk Boulevard, Phnom Penh, Cambodia.
Telephone: (855-23) 212 145
Sales: (855-23) 212 145, (855-12) 339 333, (855-16) 339 333, (855-13) 339 333
Customer Services: (855-23) 212 145
Hakse Kirirom 2
Address: No. 131Eo, Sihanouk Boulevard, Phnom Penh , Cambodia.
Telephone: (855-23) 221 123
Sales: (855-23) 221 123, (855-89) 339 333, (855-81) 339 333
Customer Services: (855-23) 221 123
Hakse Phsar Thom Thmey
Address: No. 41-43Eo, St. 126, Phsar Thom Thmey, Phnom Penh, Cambodia.
Telephone: (855-23) 213 168
Sales: (855-23) 213 168, (855-11) 339 333, (855-92) 339 333.


Angkor Meas Phone Shop:
Website: www.angkormeas.com
Address: No. 298Eo, Mao Tse Toung (St. 245), 12160, Phnom Penh
Contact: 012 802 272/ 010 802 272


Apsara Mobile:
Website: www.apsaramobile.com.kh
Address:
Apsara Phsar Thmei: #59 St. 126, Sang Kat Phsar Thmei I, Khan Daun Penh, Phnom Penh, Cambodia
Contact: +855 15 812 888, +855 23 6666 189
Apsara Oureussey: #57 St. 141, Sang Kat Oureussey II, Khan 7Makara, Phnom Penh, Cambodia
Contact: +855 12 886 888, +855 23 213 888
Apsara Parkway: St.Mao Tsetong, Parkway Department ( G6 ), Phnom Penh, Cambodia.
Contact: +855 23 5553 777, +855 23 214 188


Sokly Phone Shop:
Website: www.soklyphone.com
Address:
West of Central Market: No. 44Eo, St. 67, Phsar Thmey 2
Contact: +855 23 216 726
East of Central Market: No. 44Eo, St. 53 Corner 130
Contact: +855 23 216 725


12Leap Phone Shop:
Website: www.12leap.com
Contact: 015 543 613
Address:
12leap Sydney: #204, Street 128, Sangkat Mattapheap, Khan 7 Makara, Phnom Penh.
Infront of Sydny Market.
12leap Teukrom Phkarrom: #36Eo st. 139 Sangkat Veal Vong , Khan 7 Makara, Phnom Penh.


KoungY Phong Shop:
Website: www.koungy.com
Address:
Contact: 011 987 999/012 987 999/013 987 999/016 987 999


Second Hand Phone Shop:
Website: www.khmer2hand.com
Address: #168 Neru Blvd, Sangkat Veal Vong, Khan 7 Makara, Phnom Penh, Cambodia
Contact: 012 798272, 010 66 1010, 093 66101


Vuthy Phone Shop:
Website: www.vuthyphoneshop.com
Address: No. 653Eo, Preah Monivong (St. 93), Beung Keng Kong III, Chamkamorn, Phnom Penh.
Contact: 012 777787/011 950666/023 211616


Seang Lin Phone Shop:
Website: www.seanglin.com
Address: #184 & #186 E0, Preah Sihanouk Blvd, Phnom Penh Cambodia.
Contact: 023 222 707 / 092 220 222 / 081 220 222


Modern Phong Shop:
Website: www.modernphoneshop.com/
Address: #6A St. 215, Sangkat Phsa Depo 1, Khan Toul Kork, Phnom Penh, Cambodia.
Contact: 012 909 333 / 011 808333/012 808333/0977 808333

Sunday, June 15, 2014

What is MP3 Tag?


An MP3 tag is a metadata container in an MP3 file (ID3). It tells the information about the mp3 file and embedded in the file structure and contains data for tags like artist, track number, album, genre, year, etc. This information can be used by MP3 players, media players, software players, and can also be edited using MP3 tag editors.
When you're playing a song and see the album art image, name of the artist, album name, etc, all of these information contained in ID3. There are two unrelated versions of ID3:

ID3V1: The older ID3v1 tag which is located at the end of an MP3 file takes up 128 bytes of space. This metadata container supports up to 30 bytes for tags such as artist, album, etc.; shorter tags such as genre have a 1 byte allocation. The updated ID3v1.1 tag has an additional track number tag that the original ID3V1 doesn't. 

ID3V2:The ID3V2 specification which was released in 1998, is a frame-based container that is located at the beginning of an MP3 file. So far, there have been 3 revisions of this specification (ID3V2.2 / ID3V2.3 / ID3V2.4). Compared to the old ID3V1 and ID3V1.1, this format is very flexible and can contain up to 256Mb of metadata (max. 16Mb per frame). Currently there are 84 different frame types - you can use some of these to embed album art, lyrics, Website addresses, and more.

Root your android devices with OneClickRoot


 OneClickRoot is the leading software for Root Android phone. With just a single click, you can root Android smartphone or your tablet and get access to hundreds of new and exciting features. Root's own Android phone you can meet a lot of risk. It requires a lot of technical knowledge, and you risk turning your Android smartphone you into a useless brick.


One Click Root Software , anyone can root their Android phone to unlock all the benefits. This software is extremely powerful, but it is also very easy to use. If you know how to click the left mouse button, then you will not have any problem downloading and installing the one click root. 

See: Why Need To Root Android Phone?

OneClickRoot Software becomes stronger every day. With OneClickRoot you can root with a wide selection of Samsung, HTC, LG, Motorola and Android devices, it gives users everything they need to unlock the full potential of smart phones and Android tablets.

[Mod] Increase Galaxy S4 (GT-i9500) Volume


For Galaxy S4 users if you feel that your phone volume is not loud enough, there is a way to boost volume by modifying 'default_gain.conf', but this is for rooted devices only.

To do you need to download an app from Google Play name 'Root Browser'. After you download, open it and follow the steps below.
Step 1: If the app ask you to download some utilities -> Click Yes
Step 2: Browse to system/etc and find a file name default_gain.conf
Step 3: Long press on it (default_gain.conf) and choose Open with... 
Step 4: Choose RB Text Editor


To increase speaker volume find these lines:
Modifier "Normal" {
    SupportedDevice {
        "Speaker"
    }
    Enable {
        { "Speaker Digital Volume", 112 },
        { "SPKOUTL Input 1 Volume", 32 },
        { "SPKOUTL Input 2 Volume", 32 },
    }
}


To increase headphone volume find these lines:
Modifier "Normal" {
    SupportedDevice {
        "Headphone"
    }
    Enable {
        { "Noise Gate Switch", 0 },
        { "HPOUT1 Digital Volume", 112 },
        { "HPOUT1L Input 1 Volume", 32 },
        { "HPOUT1R Input 1 Volume", 32 },
    }
}


To increase ringtone volume find these lines:
 Modifier "Ringtone" {
    SupportedDevice {
        "Speaker"
    }
    Enable {
        { "Speaker Digital Volume", 112 },
        { "SPKOUTL Input 1 Volume", 32 },
        { "SPKOUTL Input 2 Volume", 32 },
    }
}


The volume you should adjust is between 112 and 132 
After you saved it supersu will ask you to give permission. Accept it!
-----------------------------------------
 
Caution: If you adjust speaker volume too loud it can destroy your phone speaker.

My default_gain.conf values:
Speaker: 116
Ringtone: 116

Headphone: 132 :D 

Update Galaxy S3 International to Android 4.3 Jellybean


Information from the Samsung Galaxy S3 shows that users have started to receive new updates via OTA. After upgrade to Android 4.3 Jellybean, the system is also added many new features.
If you do not receive the email updates, you can check by going to check in about phone update. However, depending on the region and the network to which the update will be sooner or later, if not then just rest assured that a few more days to wait or manually update by flashing firmware from other region from instruction below.


Files To Download: 
Samsung USB Driver: http://goo.gl/H0Nxuf 
Firmware: I9300XXUGMK6_I9300OXAGMK6_BTU
Odin 3.7: http://goo.gl/tMTdAc

Firmware Info:
Model: GT-I9300
Country: United Kingdom
Version: Android 4.3
Changelist: 2168382
Build date: Thu, 28 Nov 2013 12:07:41 +0000
Product Code: BTU
PDA: I9300XXUGMK6
CSC: I9300OXAGMK6
MODEM: I9300XXUGMK 
 (Do it with your own responsible!)
Instructions:
- Install Samsung USB Driver
- Turn Off your phone 
- Put Your Phone Into Download Mode (Press Home + Power + Volume Down)
- Connect Galaxy S3 to Computer and wait the pc install phone driver completed.
- Extract Odin & Firmware from zip and place the firmware files into odin folder.
- Open Odin
+ Make sure ID:COM connected and Auto Reboot & F. Reset Time is checked.
+ Click On PDA and browse for the file: I9300XXUGMJ9_I9300VFGGMJ5_I9300BUUGMJ3_HOME.tar.md5
+ Choose it and wait odin to load file properly
+ Click Start and wait a few minutes. 
+ When you got the message RESET!! and receive no fail your phone will restart and take a little while to upgrade applications and system. Then you're ready to use android 4.3 on your Galaxy S3.


Details and Screenshots: http://goo.gl/7S58QI

Share internet from your computer to others


If you want to share your internet from your computer to other nearby PCs or Tablets I want to introduce you a software name Virtual Router Plus. This app is support with windows 7 and 8.
Virtual Router Plus  is an excellent tool that allows you to  create a virtual router and share the internet connection with other computers . The good thing is that we do not need a router, which is very useful if there we travel and we want to share the internet connection  with others.

The operation is very simple and safe, just run it, specify the network name, password, and choose where the connection comes (as it can be USB, WiFi, Bluetooth, etc.). Once configured that give the "virtual router plus Start" and ready, and the network button is created.

Then when the other teams wish they will connect the network name as we normally do, enter the pass and go.

How To Redirect Blogger URL


Blogger is a free blog-publishing service hosted by Google and if you're having a web blog using blogger and you want to redirect your current blog to other blog or website url, you can simply copy a line of code below and paste into the blog template after the <head> tag.

<meta http-equiv="refresh" content="0;url=http://yournewurl.com"/>
content="0 : 0 is the duration in second before the code start redirect. If you want the blog redirect after 30 seconds, change it to 30.
http://yournewurl.com : change it with the url you want to redirect to. example http://www.google.com

Howto:
- Log in to your blog -> Click on Template -> Edit HTML

- Paste the code after the <head> tag:

Increase the speed of your internet by choosing the best DNS servers


Our computer will automatically choose the use of DNS servers for Internet access, and possibly this is not the best option. 

Following the next steps you can use a faster DNS servers to enhance your web browsing.

How to find fast DNS servers?

You can use public DNS servers instead of having. Start by lowering namebench open source  and GRC DNS Benchmark. Run both to see if they produce consistent results.


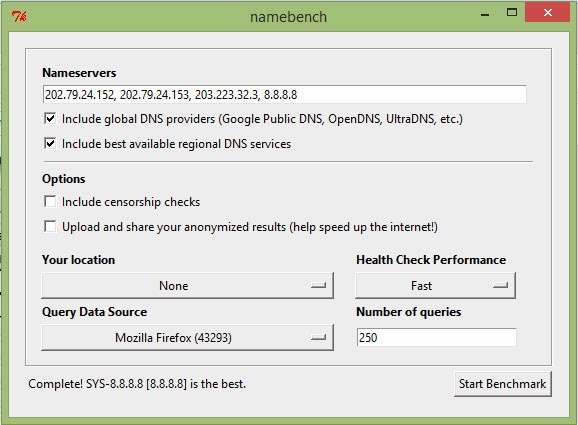
In namebench sure to select options Include global DNS providers and Include best available regional DNS services (Include global DNS providers and Include best available regional DNS services options), confirm your location and press Start benchmark ( Start Benchmark). The tool then run some tests.

In DNS Benchmark, press the Nameservers tab and click the Add / Remove button (Add / Remove). In the Edit window IP DNS servers, click Create personal list of Nameserver (Build Custom Nameserver List). In the resulting dialog, click Build custom list (Build Custom List) and wait about 40 minutes until the process finishes. When the list is complete, click Run benchmark (Benchmark Run) in the Nameservers tab.

In both tools, the servers that have faster response times should provide the best performance. Take note of the top three IP addresses.

Configure your router

To make all the systems on your network (regardless of OS) use the same server, you must change the configuration of the router. These are the basics, so it should study the manual to refer to specific steps.

In your Web browser, type 192.168.0.1 or 192.168.1.1 in the address bar. If neither addresses work, choose Control Panel: > Network and Sharing Center> Change adapter settings , double click on the active network connection, press Details and find the address under 'IPv4 Default Gateway '. Take that address, add 'http://' in front of it and paste it in the address bar of your browser.

Access the router (check your manual for the proper credentials). Click Basic Settings or Network Configuration and look for a section called "Configuring server network address (DHCP) '[Network Address Server Settings (DHCP)] or something similar. Enter the IP address of there faster to the area where DNS server resides. Save the changes and then restart the router.